How to Ship Furniture by LTL Freight
Prepare furniture for LTL freight with construction-specific packaging, stable support, current classification, verified delivery scope, and condition evidence.
To ship furniture by LTL freight, first decide whether the piece can be prepared as a stable handling unit for a shared freight network. Protect the finish and vulnerable components, use a pallet, skid, or crate that supports the actual load, keep the furniture within the base footprint, measure and weigh the completed package, identify the current NMFC item and class, and confirm the pickup and delivery services before requesting rates.
LTL is not automatically the right choice for every chair, cabinet, table, sofa, or furniture order. The decision depends on the finished handling units, construction, fragility, value, packaging, lane, facilities, delivery scope, timing, and carrier rules. A one-off antique that needs blanket-wrap and room placement may require a different service from boxed ready-to-assemble furniture going dock to dock.
Step 1: Define the furniture and the receiving job
Start with an inventory of what will actually move:
- furniture type, materials, finish, and condition;
- assembled, partially disassembled, or flat-pack configuration;
- removable legs, shelves, drawers, leaves, doors, cushions, glass, stone, or hardware;
- number and type of cartons, pallets, skids, or crates;
- greatest packaged length, width, and height of each unit;
- gross weight of each finished unit and the shipment total;
- truthful stackability and orientation restrictions;
- origin and destination postal codes and facility types; and
- required pickup, appointment, notification, unloading, placement, or other services.
Confirm that the available LTL carrier accepts the commodity and finished package. Long, unusually tall, non-stackable, fragile, high-liability, irreplaceable, or difficult-to-handle furniture may need prior approval or a more specialized service. Compare real options for the same delivery scope rather than assuming LTL is always the lowest-cost choice.
Step 2: Choose a packaging path for the furniture
Furniture is not one packaging problem. A flat-pack desk, assembled dresser, upholstered chair, stone-top table, and antique cabinet expose different surfaces, joints, edges, and load paths.
Use the furniture manufacturer’s transport instructions when available. Have a qualified packaging reviewer design or approve the package when the piece is high-value, fragile, unusually shaped, or difficult to replace.
Flat-pack and ready-to-assemble furniture
Protect panels from corner impact, edge crush, abrasion, and flexing. Keep hardware in a sealed inner package and prevent it from moving against finished surfaces. Use partitions or pads between panels, reinforce long cartons where needed, and arrange cartons in a stable pattern on a sound base.
Long boxes should not overhang the pallet merely to fit a nominal footprint. Restraint should hold the carton group without crushing the contents. If the upper surface cannot safely support other freight, disclose the unit as non-stackable rather than relying on a light top sheet or label.
Assembled case goods, tables, and cabinetry
Secure doors, drawers, leaves, and other moving parts using methods compatible with the finish. Remove legs, shelves, glass, or hardware only when the design and reassembly process allow it, then package each removed part so it cannot contact the main piece.
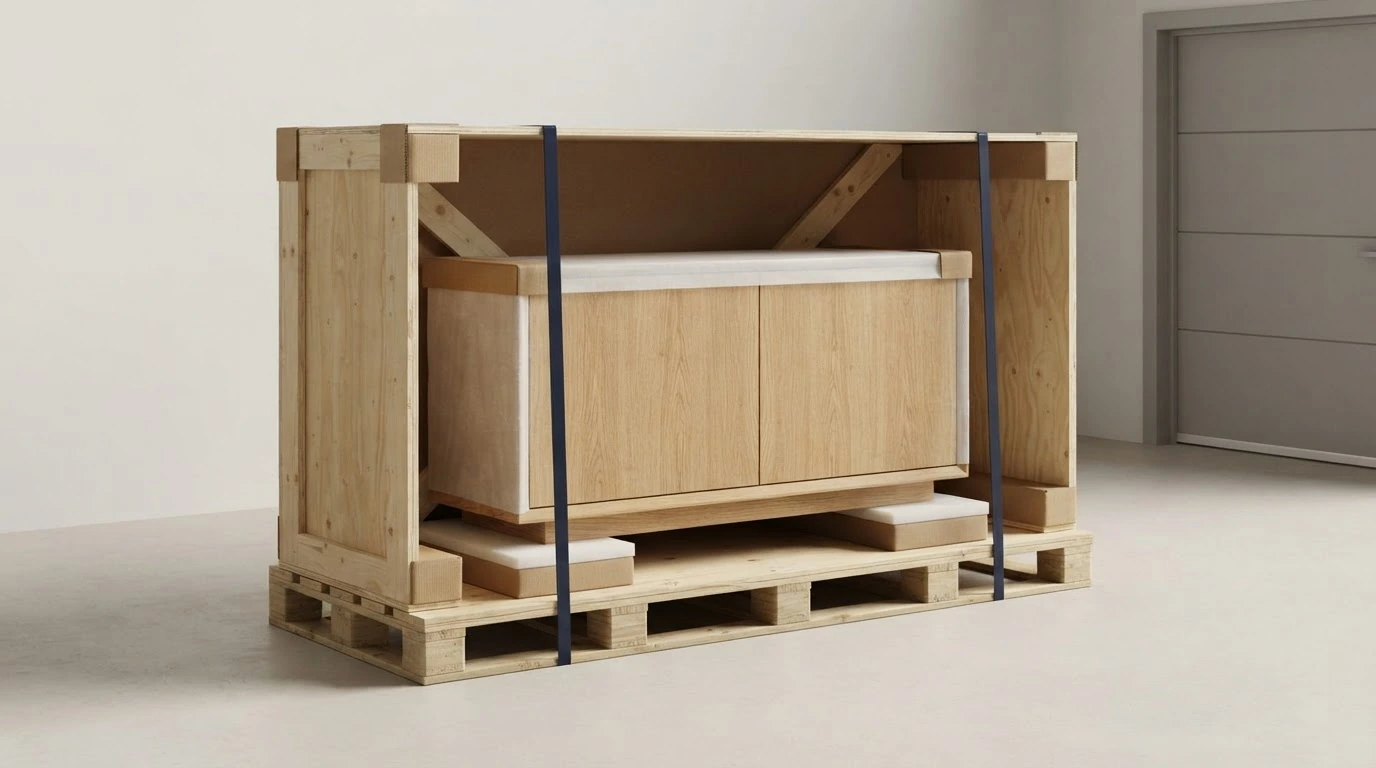
Support the furniture through structural areas. Do not make decorative legs, thin aprons, casters, or projecting trim carry the shipping load. Protect corners and edges, isolate the finish from abrasion, and use a rigid outer enclosure when exposed geometry cannot be safely contained by a carton.
Upholstered furniture
Use a clean abrasion barrier around fabric or leather and guard frames, feet, corners, and reclining or folding mechanisms. Keep moisture protection appropriate to the material and route; a sealed wrap that traps condensation can create a different problem. Do not depend on moving blankets alone as structural packaging or restraint.
Glass, mirrors, stone, and brittle components
Remove and package detachable glass or stone separately when the manufacturer permits it. Use product-specific cushioning and a rigid container that controls movement and protects faces and edges. Keep the package in the approved orientation and ensure that restraint loads transfer through the container or structural supports rather than through the brittle panel.
Markings such as “fragile” or “this side up” communicate handling information but cannot compensate for inadequate packaging. Confirm carrier acceptance and packaging requirements before tender.
Antiques, prototypes, and high-value pieces
Document condition before packaging and use a packaging specialist when value, finish, provenance, or repair difficulty warrants it. A custom crate, fitted blocking, climate considerations, specialized handling, or a dedicated service may be appropriate. Do not select standard LTL solely because the finished dimensions appear to fit.
Step 3: Build a stable handling unit
The pallet, skid, or crate must support the finished weight and geometry while allowing the handling method expected in the carrier network. Use a base with sound deck boards, blocks or stringers, fasteners, and suitable fork access. Distribute weight through the base and keep the center of gravity stable.
For the finished package:
- keep all furniture and protective materials within the base footprint;
- block or contain movement without damaging the product;
- protect corners, edges, finished faces, and protrusions;
- separate components that could strike or rub against one another;
- use edge protectors where banding could cut or crush packaging;
- make strap paths continuous and mechanically useful;
- use stretch film for containment and protection, not as the only restraint for a heavy piece;
- provide a stable top only when the unit can support the expected loading environment; and
- remove old or conflicting labels before adding current identification.
FedEx’s current freight-packing guide distinguishes pallets, crates, blocking, bracing, load protectors, edge boards, banding, and stretch wrap because they perform different jobs. XPO’s current freight-protection resources likewise focus on packaging performance in the LTL environment. Choose materials to control the furniture’s actual risks, not simply to make the load look wrapped.
Step 4: Measure and classify the complete package
Measure the extreme outer dimensions after every carton, crate panel, corner protector, pad, strap, and base component is in place. Include projections and irregular tops. Weigh the complete handling unit rather than using the furniture’s catalog weight or estimating the package.
Describe the commodity specifically enough to identify the current NMFC entry. “Furniture” alone may not distinguish construction, use, material, setup condition, or packaging. Review the applicable NMFC item, notes, packaging provisions, and class for the actual furniture as prepared.
NMFTA describes classification through density, handling, stowability, and liability characteristics. Density may matter, but a large light piece does not receive a class from dimensions alone, and one furniture class does not apply automatically to every table, cabinet, chair, sofa, or mixed order.
Record whether the package can truthfully support top freight. A non-stackable declaration can affect handling, stowability, acceptance, or charges, so it should reflect the finished unit rather than a preference to keep the top clear.
Carry the same unit count, packaged dimensions, weight, commodity description, NMFC item, class, and stackability from the quote into the required shipping document and tender. Update the record if the package changes.
Step 5: Map delivery language to actual service
Furniture shipments often fail at the handoff between transportation language and the receiver’s expectation. Confirm the service scope in plain language before booking.
Ask at both ends:
- Is there a usable dock or forklift for this handling unit?
- Is a liftgate needed, available, and suitable for the finished unit?
- Does the location meet the carrier’s residential or limited-access definition?
- Is an appointment or advance notification required?
- Where does the carrier’s standard pickup or delivery responsibility end?
- Does the available service include curbside, threshold, inside, or room placement?
- Are stairs, elevators, narrow doors, tight turns, or long carries involved?
- Are unpacking, assembly, installation, or packaging removal expected?
- Are there receiving hours, security procedures, vehicle limits, or contact requirements?
Liftgate, residential, limited-access, appointment, notification, inside, and threshold services are separate concepts. Room placement, stairs, assembly, installation, and debris removal should never be inferred from the word “inside” or from a residential delivery charge. Carrier names, definitions, limits, availability, and charges vary.
If the receiver expects a two-person furniture service or white-glove work, confirm that exact service rather than adding ordinary LTL accessorials and hoping the scope matches.
Step 6: Prepare consistent documents and labels
Use the shipping document and identification required for the movement. Make the parties, addresses, contacts, handling-unit and piece counts, package types, dimensions, weights, commodity descriptions, NMFC information, classes, stackability, and requested services agree with the quote and physical freight.
Avoid vague descriptions such as “household goods” or “merchandise” when a more accurate furniture description is available. Place current labels where they remain visible and secure without applying adhesive directly to a sensitive finished surface.
Review the carrier’s current tariff, service rules, and liability terms. Do not assume that entering a declared value creates full replacement-cost protection or that optional insurance covers every cause of loss. Limits, exclusions, packaging conditions, deductibles, valuation methods, notice requirements, and claim procedures depend on the governing terms.
Step 7: Create condition evidence before pickup
Photograph each piece before packaging when its condition or value warrants it. Photograph the completed handling unit from multiple sides, including the base, top, restraint, labels, and any vulnerable area. Retain:
- product or inventory identifiers;
- a component and hardware count;
- condition notes and images;
- packaged measurements and weight records;
- packing or crating records;
- the accepted quote or pricing reference; and
- the completed shipping document and pickup record.
Inspect the package immediately before tender for loose restraints, crushed corners, overhang, instability, tears, exposed surfaces, moisture, or conflicting labels. Good records support an investigation but do not guarantee a claim result.
Step 8: Prepare the receiver for delivery
Give the receiver the expected handling-unit and piece counts, package description, appointment process, delivery scope, and inspection steps. Distinguish an estimated transit time from a guaranteed service, and avoid promising an exact arrival based only on an estimate.
At delivery, compare the counts and inspect visible package condition before signing when practical. Record visible shortage or damage specifically on the delivery receipt when appropriate, take photographs, preserve the furniture and packaging, and follow the carrier’s current notice and claim procedures. Concealed-damage rules and deadlines can vary.
Two furniture examples without invented rates
Flat-pack tables going to a commercial warehouse
A furniture seller tenders several long cartons as one handling unit. The team protects the panels and hardware, reinforces weak carton areas, uses a base long enough to eliminate overhang, adds corner protection, and restrains the carton stack without crushing it. The warehouse confirms dock access and an appointment rule. The quote uses the finished unit’s dimensions, weight, specific commodity description, current classification, and truthful stackability.
Assembled cabinet going to a small showroom
An assembled cabinet has finished doors, removable shelves, and vulnerable corners. The shelves are separately protected, the doors are secured with a finish-safe method, and the cabinet is supported through its structural base inside a rigid crate. The showroom confirms that it has no compatible dock and explains the desired placement. The shipper verifies the available unloading and delivery scope before quoting rather than assuming liftgate service includes inside placement.
Furniture LTL quote checklist
- Final origin and destination postal codes and facility types
- Furniture type, material, setup condition, and specific commodity description
- Complete handling-unit and piece counts
- Sound pallet, skid, or crate with suitable fork access
- Product-specific finish, edge, corner, component, and moisture protection
- Stable restraint and no unintended overhang
- Extreme packaged dimensions and gross weight per unit
- Current NMFC item and freight class when applicable
- Truthful stackability and orientation restrictions
- Verified liftgate, residential, limited-access, appointment, notification, inside, or specialized-service needs
- Consistent quote, shipping document, labels, and tender data
- Pickup and delivery condition records
Shipocity is backed by a team with more than 40 years of combined logistics experience. Through established industry relationships, the platform helps businesses compare competitive freight rates for their specific shipment.
Sources
- How to pack and ship furniture - FedEx
- Freight packing guide - FedEx
- Packaging and class: how packaging decisions change density and your invoice - National Motor Freight Traffic Association
- National Motor Freight Classification - National Motor Freight Traffic Association
- LTL freight protection guides - XPO